Product Update Briefing
Blackbaud Financial Edge Edge NXT: April 2024
Details about the "Available now" capabilities discussed in the April 2024 Product Update Briefing are below. For some features, corresponding blog posts from the Blackbaud Financial Edge NXT Community are also listed.
Total Web Solution
As Blackbaud Financial Edge NXT shifts to a total web solution, we're moving features from database view exclusively to web view over the next several months.
Since we release in waves, you may receive the updates immediately or in a future release. To track details and timelines, review this page and bookmark Total Web Solution.
Note: To keep you informed of upcoming changes, we will periodically display a Review total web solution features screen when you log in to Financial Edge NXT listing upcoming features that are moving to web view.

Receivables
With the read-only Preview for Receivables now complete, we're releasing related features in web view in small, usable increments.
You can now customize journal references. A journal reference is a user-defined, alphanumeric code added to each journal entry transaction during batch creation. Use journal references to track details and compare transactions with source documents.
Under General ledger, Settings, Posting info, customize these journal references using prefixes for adjustments and reversals, journal values for transactions, as well as field and length details.
Note: This feature released for all subledgers except Receivables on January 29, 2024. Receivables soon followed on February 14, 2024.
For more information, see Posting Info.
You can now add custom fields for receivables from Control panel, Fields and tables. When you add a custom field, under Subledger, select "Receivables" to make the field available for use in all relevant areas.
Note: In database view, custom fields are called attributes.
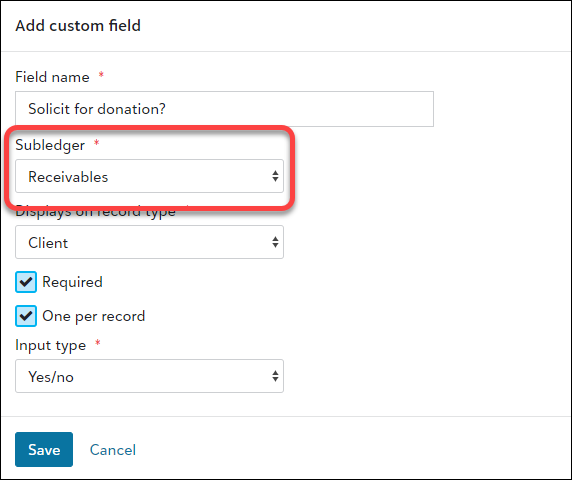
For more details about custom fields, see Custom Fields.
You can now add, edit, void, and delete deposits from Receivables, Deposits. When you add a new deposit, under the new Deposit type section, select Receivables.
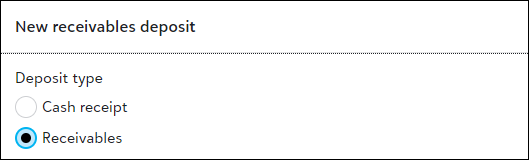
The remaining steps to add and manage a deposit for receivables is the same as a deposit in Treasury. For more details, see Deposits.
Note: The receivable payments associated with these deposits are in database view. In a future release, we'll offer full support for adding payments in web view.
From Receivables, Payments, you can now view the list of payments for receivables and their record pages in web view.
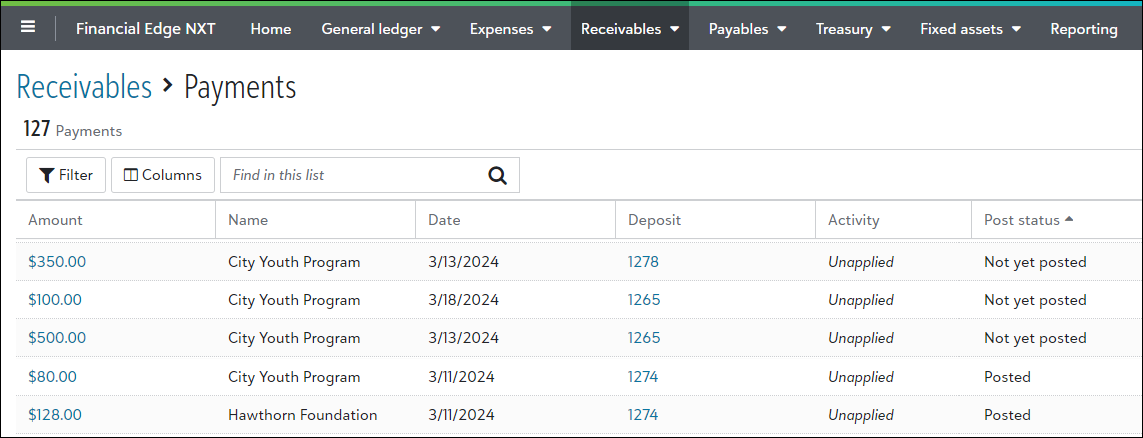
Note: In a future release, we'll offer support for third-party billing, as well as the ability to add, edit, and delete all payments for receivables.
To view a payment, select it in the Amount column.
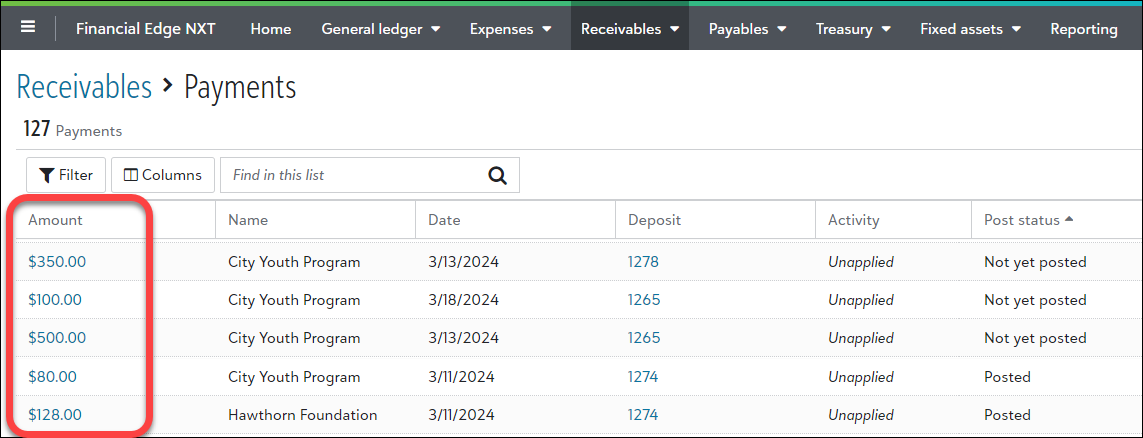
The page opens for you to view important data such as the status, the charges for the payment, and details for the associated deposit.
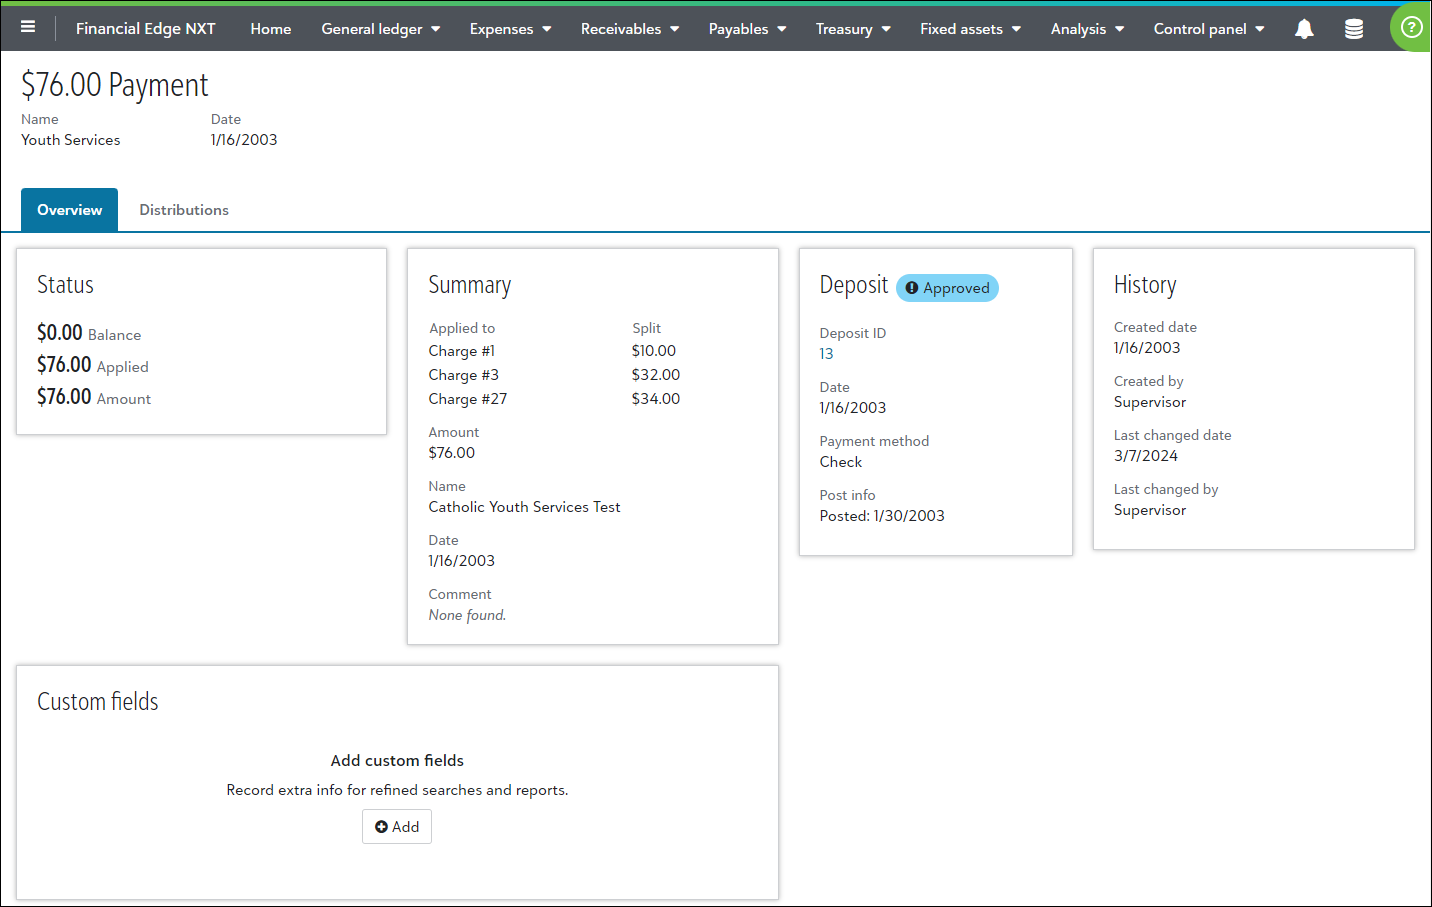
For more details, see Payments.
From Receivables, Billing items, you can now view the list of billing items for receivables and view record pages for flat rate, variable rate, and product billing items in web view.
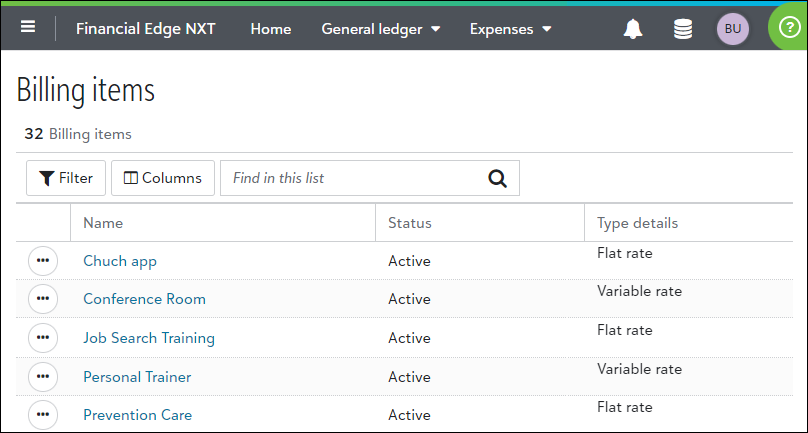
Note: In a future release, we'll offer view support for other billing item types in web view, as well as the ability to add, edit, and delete billing items.
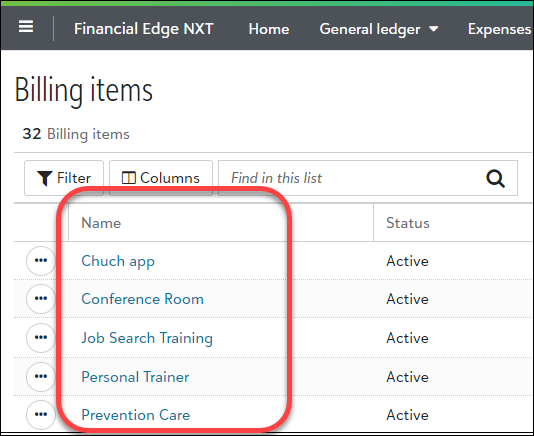
To view the record for a flat rate, variable rate, or product billing item, select it in the Name column.
The page opens for you to view important data such as the description, status, comments, and history.
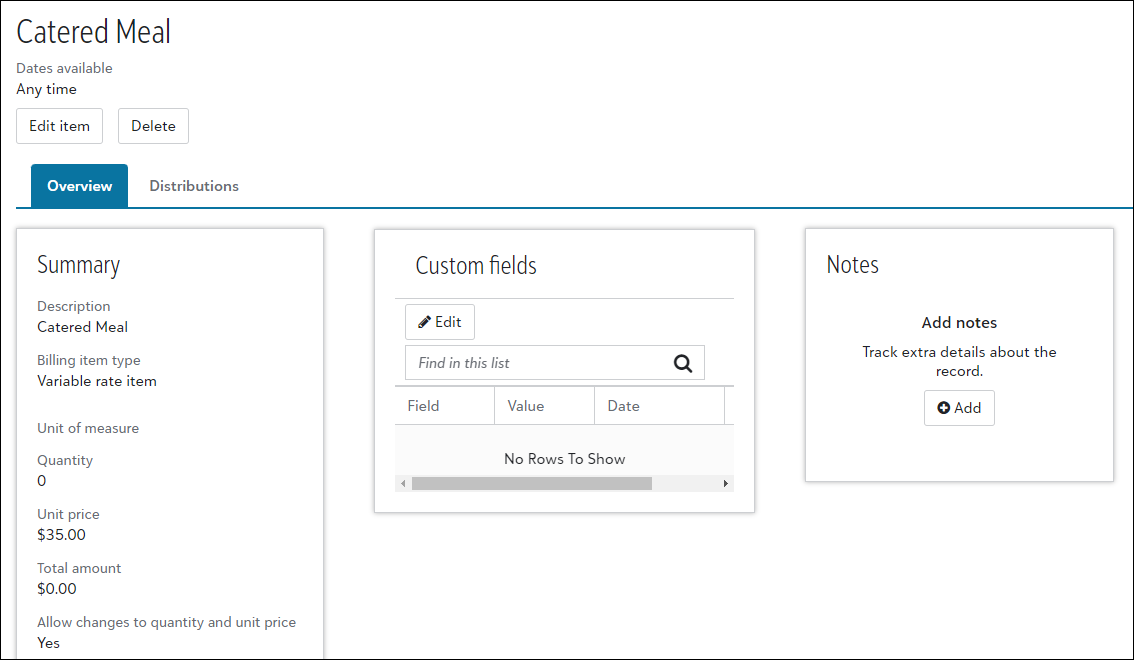
For more details, see Billing Items.
From Receivables, Credits, you can now view the list of credits for receivables and their record pages in web view.
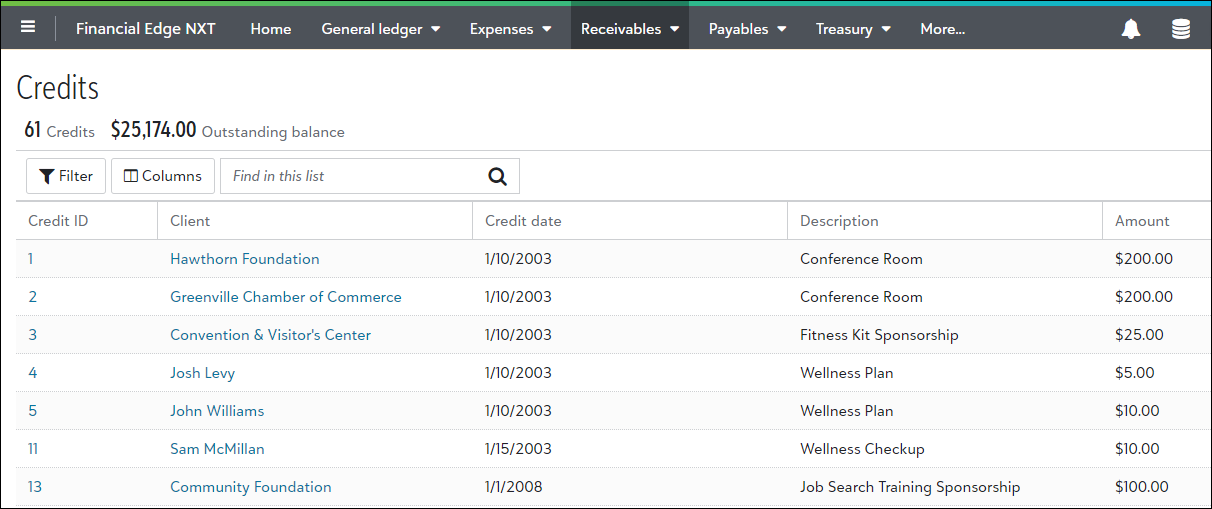
Note: In a future release, we'll offer support for third-party billing, as well as the ability to add, edit, and delete all credits for receivables.
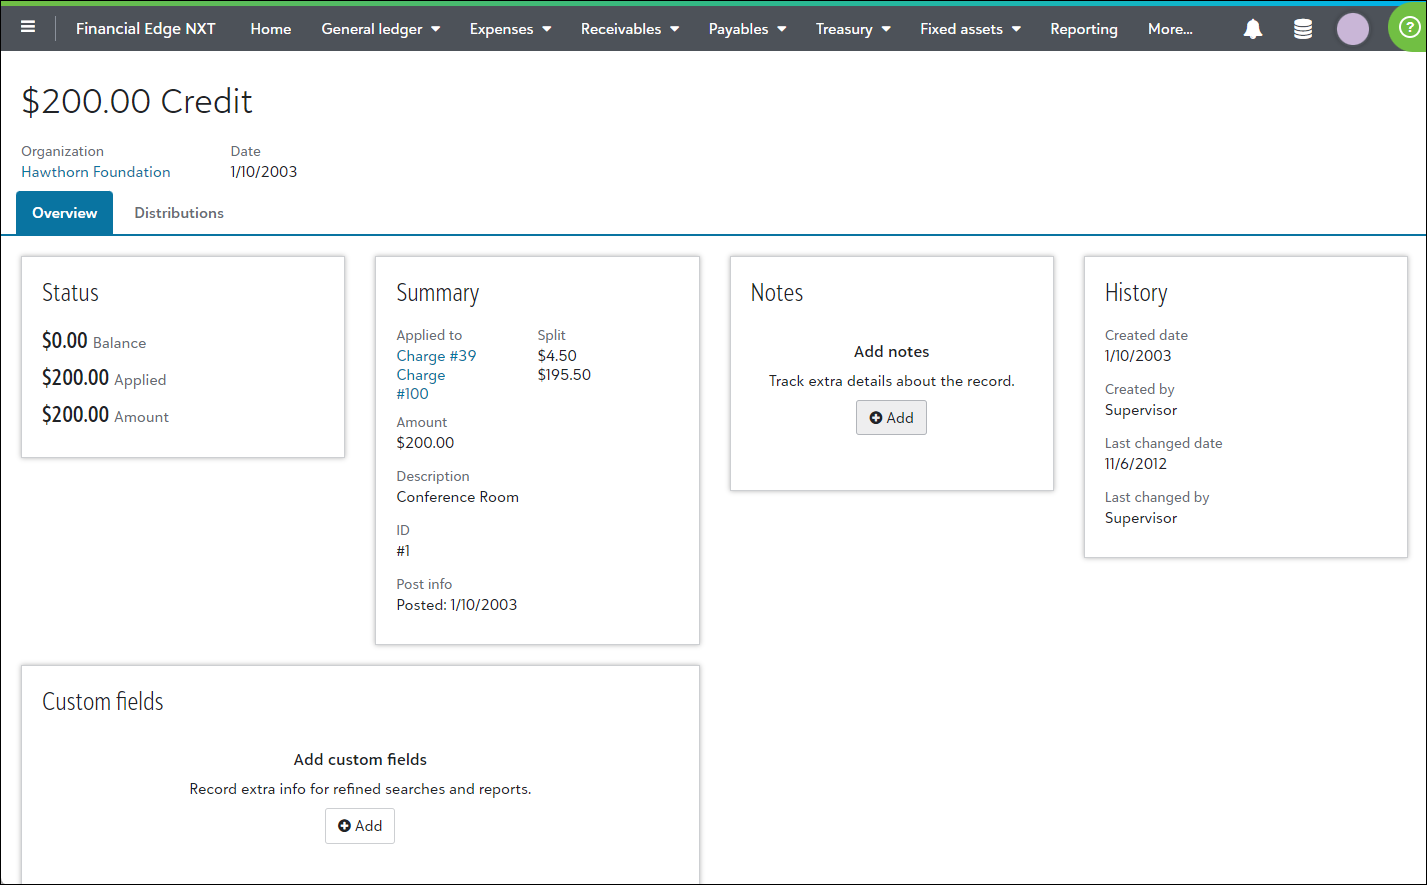
To view a credit, select it in the Credit ID column.

The page opens for you to view important data such as the status, the charges for the payment, and details for the associated deposit.
For more details, see Credits.
From Receivables, Query, you can now view queries from the database view. For more details, see Query.
Note: While most of your queries are visible in web view, you may not be able to view or run a query if you don’t have permission to view them or support for the query is coming in a future release.
From Receivables, Clients, you can now search for, view, and add, edit, and delete client records.
For more information, see Clients.
Under Receivables, Settings, you can now select Configuration, Statement info to view and edit custom transaction references to use on statements. Here, you define reference info for all receivables transaction types, such as payments and credits.
Note: The first option to release under the new Receivables, Settings feature area is the ability to edit statement info. Look for additional settings in a future release.
For more information, see Statement Info.
Under Reporting, you can now add and run the Account distribution report. Use this report to view debit and credit amounts created by receivables transactions and adjustments.
For more information, see Account Distribution Report for Receivables.
Under Reporting, you can now add and run the Aged accounts receivable report. Use this report to view balances distributed in aging periods which will help determine past due and current balances for clients.
For more information, see Aged Accounts Receivable Report.
Under Reporting, you can now add and run the Open items report. Use this report to view open transactions (including charges) based on a selected date. Determine if transactions posted properly and which subsidiary ledger transactions are causing a difference in your general ledger balance.
For more information, see Open Items Report.
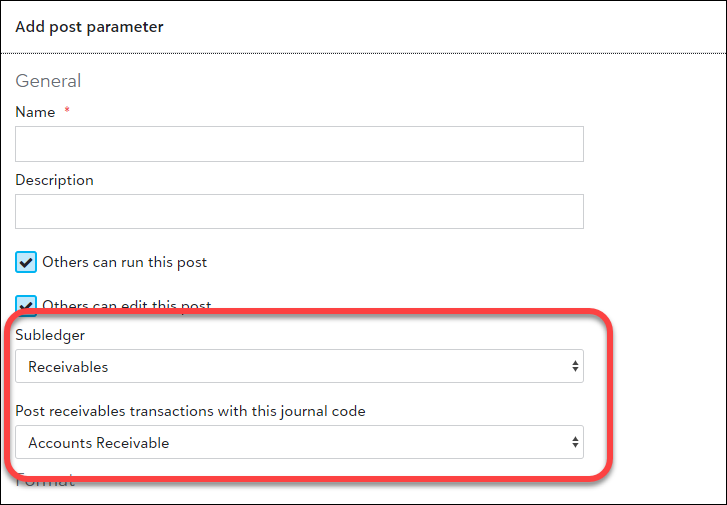
From General ledger, Post subledgers, you can now add post parameters and post transactions for receivables.
When you add a post parameter, under Subledger, select "Receivables". You can then specify a journal code to assign to transactions.
To post receivables transactions, select Receivables.
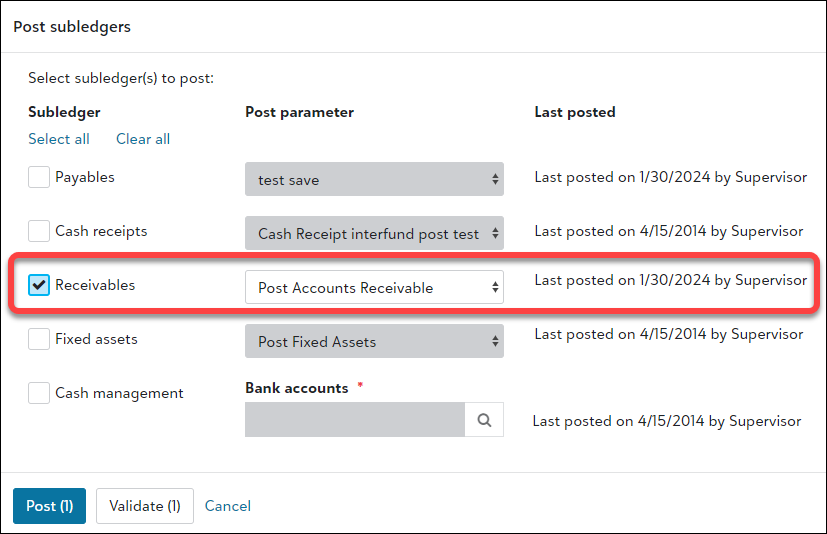
Note: Receivables transactions will post from database view. In a future release, we'll offer full support for adding and managing receivables in web view.
The remaining steps for adding parameters and posting transactions remains the same as it is for other subledgers. For more details, see Post Subledgers.
Journal references for posting
You can now customize journal references. A journal reference is a user-defined, alphanumeric code added to each journal entry transaction during batch creation. Use journal references to track details and compare transactions with source documents.
Under General ledger, Settings, Posting info, customize these journal references using prefixes for adjustments and reversals, journal values for transactions, as well as field and length details.
Note: This feature released for all subledgers except Receivables on January 29, 2024. Receivables soon followed on February 14, 2024.
For more information, see Posting Info.
Optimize fiscal years
You can now optimize fiscal years. This process summarizes transaction data for a fiscal year to improve report processing speed. We recommend you optimize fiscal years when transactions are no longer being added. To optimize fiscal years, go to General ledger, Fiscal years, Manage all fiscal years, and select Optimize.
For more information about invoices, see Manage All Fiscal Years.
Grant budget tile
Use the Budget tile on the grant record to add, edit, and view budget details associated with the grant. From this tile, view a summary of budget activity information, including actual and budgeted amounts for a specified time period.
For more information, see Grant Record.
Yodlee enhancements
If you use Yodlee for your bank and credit card feeds, there are several new features.
Tip: Yodlee is your third-party financial aggregator for bank and credit card feeds in Financial Edge NXT. For more details about the Yodlee upgrade, review Key Benefits on their website.
Refresh Online Transactions
-
Download and clear on the Bank accounts page has been replaced with Refresh on individual bank account records. As a reminder, you refresh an account to download online transactions from Yodlee for the account. You can select Refresh from the row's menu
 in the list of bank accounts or under Online balance on the bank account record
-
Refresh all on the Credit card accounts page has been replaced with Refresh on individual credit card account records. As a reminder, you refresh an account to download online transactions from Yodlee for the account. You can select Refresh from the row's menu
in the list of credit card accounts or beside Online balance on the credit card account record.

Tip: Refresh was previously called Refresh transactions for credit card accounts.
Post dates for Yodlee transactions
-
To help minimize duplicate transactions when refreshing Yodlee, only posted transactions with a post date from the financial institution now download to Financial Edge NXT. Be aware this may briefly indicate transactions are missing if some disappear after refreshing again. These transactions aren't missing but were removed during the refresh because they did not have a post date from the financial institution.
Yodlee upgrade now available (for some of you)
The Yodlee upgrade is now available for some of you to improve efficiency and your overall customer experience for bank and credit card feeds. This upgrade also improves security.
Tip: Yodlee is your third-party financial aggregator for bank and credit card feeds in Financial Edge NXT. For more details about the Yodlee upgrade, review Key Benefits on their website.
Scheduling the upgrade
We're making the upgrade available in waves. For some of you, an admin at your organization will be prompted immediately to schedule it from Treasury in Financial Edge NXT. From the Bank accounts and Credit card accounts pages, a banner displays for admins with a schedule the upgrade link. Other organizations will be prompted in an upcoming wave.

-
The schedule options an admin can select are:
-
Now
-
Tonight at 11:30 PM (your time)
-
Automatically upgrade on (10 days from when the upgrade is made available to your organization)
-
Specific date and time (must be within 10 days)
-
-
During the upgrade process, your Financial Edge NXT bank and credit card accounts are unlinked from your online accounts. Be aware that after the upgrade completes, you must re-link these accounts.
For more details about upgrading, review the Upgrade Yodlee tutorial.
After the upgrade
After the Yodlee upgrade completes, several features have changed.
-
The list of bank accounts and the list of credit card accounts includes a new Online status column option you can select to display. This column determines if the account in Financial Edge NXT is actively linked to an online account or if it "Needs attention." When an account needs attention, you must take additional steps to successfully link the account to one online. For example, it's possible you need to select a checking or savings online account or you may need to update credentials for the financial institution.

The Online status column replaces the [x] bank accounts have incomplete setup banner above the list of bank accounts and the Bank account setup is incomplete warning in the Account column. For credit cards, the column replaces the Update needs attention warning above the list of credit card accounts.
Calculate depreciation filters
To provide more control over fixed asset depreciation calculation, you can now add filters directly from the Calculation settings screen. Filters include, assets, classes, locations, departments, and asset custom fields.
For more information, see Calculate Depreciation.
Business rules for Fixed Assets
You can now manage business rules for assets and transactions. With business rules, you can customize standard procedures and requirements to suit your organization.
To define transaction business rules, select Fixed assets, Settings.
For more information, see Fixed Assets Business Rules.
Edit account structure
Under General ledger settings, you can edit the account structure to update the segment order, add new segments, or increase segment length.
For more information, see Account Structure.
Register tab on bank accounts - sorting improvements
On the Register tab for bank account records, we improved the way you sort recent transactions to view account balances.
Now, when you sort the list of transactions in descending order by Date, Clear date, or Post date to display the newest transaction first, Current balance displays in reverse order. The subsequent rows also display the correct "as of" balance for each transaction in the Account Balance column, in order of newest to oldest transaction.
Tip: The most recent sort option you selected remains in place until you select a different one. To retain the previous experience, simply sort by ascending dates or by any other column.
For more information about the Register tab, see Bank Register.
Manage activity types (for Canadian customers)
You can now view and manage the Public Service Bodies’ (PSB) activity codes and rebates, and add activity types.
To add an activity type, navigate to Configuration under Payables, Settings.
Note: The options that appear under Settings are based on the user’s permissions.
For more information, see Payables Configuration.
Sort and print checks
You can now specify a sort order and direction when printing checks. For example, you may want to print checks for a specific vendor first, followed by other vendors. From the Edit payment run settings screen, select a sort order and direction.
Tip: As a reminder, you edit payment run settings in Treasury. From the menu of a bank account, select Process payments and specify Computer check. After you Show print settings, select to edit the payment run settings.
For more information, see Payment Run Settings.
Project distribution report
Under Reporting, you can now run the Project distribution report. This report lists all debits and credits associated with each project in either detail or summary format.
For more information, see Project Distribution Report.
Credit memos
From Payables, Credit memos, you can now access credit memos.
With this enhancement, you can now view and manage all credit memos in a more holistic way. As with other list pages, you can manage common tasks such as add, edit, view, and delete directly from Payables.
Tip: From a vendor record, you can still access and work with vendor-specific credit memos as before.
For more information, see Credit Memos.
Recurring amount journal entry batches
Recurring amount batches are useful when you work with transactions that occur on a regular basis. Once you create a recurring batch, save time by using it as a template to create additional ones. For example, create a recurring amount batch to post utility bills or lease payments without creating a new batch for each instance.
From General ledger, Journal entry, you can now add, edit, and delete recurring amount journal entry batches in web view. Previously, recurring amount batches displayed on the Journal entry batches page, but you couldn't work with them. You could only identify them as recurring amount batches under Batch type.
For more information, see Add a batch.
Features releasing in waves
Note: Don’t see these features yet? They are currently in Limited Availability (LA) and will be widely available soon.
Note: Query is currently in a read-only view. We'll monitor your feedback and make improvements as we prepare for future releases.
To find records that meet certain criteria, you can now view queries in web view that were created in database view. To navigate to Query, select it from the following:
-
General ledger
-
Payables
-
Treasury
-
Fixed assets
Note: In a future release, you'll also access Query from Accounts Receivable.
Note: While most of your queries are visible in web view, you may not be able to view or run a query if you don’t have permission to view them or support for the query is coming in a future release.
For more information, see Query.
You can now manage payables business rules. Payables business rules help you customize standard procedures and requirements to suit your organization.
To define payables business rules, navigate to Payables, Settings.
Note: The options that appear under Settings are based on the user’s permissions.
You can now manage these rules for the following:
-
Automatic applications
Note: Select to automatically apply open credit to new invoices from Automatic applications. You previously managed this under Invoice Business Rules in database view.
-
General
-
Vendors
-
Invoices
-
Credit memos
-
Payments
-
Adjustments
-
Purchase orders
-
Line items
-
Receipts
You can also manage invoice requests business rules for expense management. Other business rule features that aren't available in web view, such as recurring invoice, requisition, and queue, are managed in the database view. In a future release, you’ll define more settings with Configuration in web view.
Note: You can still view and manage these business rules in the database view. In the future, they will become read-only.
For more information, see Payables Business Rules.
You can now manage payables configuration settings. Payables configuration settings help you define settings and features to customize Payables. For example, adjust settings to increase the efficiency of your record keeping and improve data entry.
To configure payables settings, navigate to Payables, Settings.
Note: The options that appear under Settings are based on the user’s permissions.
View configuration settings for the following:
-
Organization info
-
Aging info
-
Payment terms
-
Addresses
-
Default accounts
Note: You can still view and manage these configuration settings in the database view. In the future, they will become read-only.
For more information, see Payables Configuration.
You can now add and manage purchase orders. Purchase orders are used to track and manage order to outside organizations.
To add or view existing purchase orders, navigate to Payables, Purchase orders. You can also add and manage purchase orders for a vendor from their vendor record. For more information, see Vendor Record.
For more information, see Purchase Orders.
You can now add and manage purchase order receipts. When you create a receipt for a purchase order, you automatically generate the entries required to reverse encumbrance transactions posted from a purchase order. A receipt also acts as a template you can use for creating invoices for items you've received.
To view purchase order receipts, navigate to Payables, Receipts. From the purchase order record, receipts info also displays from the Receipts tile and the Receipts tab.
For more information, see Purchase Order Receipts.
To save time and increase efficiency around data entry, you can now import Payables invoices.
From Payables, Invoices, select Import to create new invoice records using a .csv, .xls, or .xlsx file. You can download initial templates, add invoice details, upload, and import. During the upload and import process, detailed validation and error messages help you understand supported file types, required fields, and processing requirements. If errors occur, you can view a list of import exceptions, correct any issues, and import again.
Note: This release supports adding new invoice records through import. In a future release, look for the ability to add and edit invoice records in bulk (including 1099 distributions and interfund sets) as well as support for purchase orders, invoice bypass approval based on business rules, and invoices paid by credit card.
For more information about invoices, see Invoices
From Expenses, Settings, use the new Approval rule groups tab to add, edit, and delete approval rule groups, associate approval rules, and specify which users to include in those groups. These new approval rule groups are no longer tied to the security groups you previously configured in database view (from Accounts Payable, Administration).
From Expenses, Settings, Approval rules, you can continue to add new approval rules, as well as edit and delete existing ones. This is existing functionality. However, note that when you select Edit groups, the list only displays the approval rule groups added from the new Approval rule groups tab and are no longer tied to the security groups you previously configured in database view (from Accounts Payable, Administration).
For more information, see Approval Rule Groups.
You can now specify default approval rules to use on purchase requests. To select a default approval rule, select Edit on the Edit my settings tile.
Note: Admins - you can set up defaults for specific users under Expense management, User settings.
You can also set up notifications and out of office forwarding for your purchase requests. From the Edit my settings page, under Purchase request notifications, select the types of notifications you want to receive, and when to send them.
For more information, see Edit Settings.
You can now define business rules for purchase requests. Business rules help you customize standard procedures and requirements to suit your organization. To define purchase request business rules, select Expenses, Settings, Business rules.
For more information, see Expense Management Business Rules.
You can now apply approval rules to purchase requests. Approval rules route purchase requests to selected reviewers. When you create an approval rule, specify whether the rule is for invoice requests, purchase requests, or both. This information will display in the Type column of the Approval rules grid.
For more information about invoices, see Approval Rules.
Previously, you managed security groups for bank accounts in database view. Now, you can add, edit, and delete bank security groups in web view, and specify which users are included in those groups. Moving this workflow to web view will open more opportunities to release important features.
From Control panel, Record security, you can work with bank security groups, manage user security for those groups, and confirm access. Previously, you worked with these settings from Administration, Set up system security in database view.
For more information, see Record Security.
Previously, you managed signature security in database view. In web view, you can now allow users to select and use specific signatures. Moving this workflow to web view will open more opportunities to release important features.
From Control panel, Record security, User security, you can manage security for signatures. Previously, you worked with these settings from Administration, Set up system security in database view.
For more information, see Record Security.
Previously, you managed account security in database view. In web view, you can now allow users to grant or prevent access to all or selected accounts.
From Control panel, Record security, User security, you can manage security for accounts. Previously, you worked with these settings from Administration, Set up system security in database view.
Warning: As you work with account security, Query may be selected and unavailable if you based account or project security on a query in database view. In web view, full support for basing security on a query will be available in a future release.
For more information, see Record Security.
Previously, you managed project security in database view. In web view, you can now allow users to grant or prevent access to all or selected projects.
From Control panel, Record security, User security in web view, you can manage security for projects. Previously, you worked with these settings from Administration, Set up system security in database view.
Warning: As you work with project security, Query may be selected and unavailable if you based account or project security on a query in database view. In web view, full support for basing security on a query will be available in a future release.
For more information, see Record Security.
You can now add default flat amount line items (formerly miscellaneous line items), such as freight charges and local sales taxes, to quickly select them when you create purchase orders.
To add default flat amount line items, navigate to Configuration under Payables, Settings.
Note: The options that appear under Settings are based on the user’s permissions.
For more information, see Flat amount line items.
You can now define online security for your expense management users. To define online security, go to Expense management settings, and select User settings, Edit security. Use the tabs on the left to select Purchase request security or Invoice request security.
For more information, see Online Security.
Administrators now manage all aspects of user permissions in web view. User permissions currently managed in database view through security groups now appear as "permission roles" in web view. These web view permission roles include names and descriptions that correlate to the original database view security groups.
Tip: You can edit the name and description for security groups at any time.
Note that you can still view user permissions in the database view as read-only. Other user access features that aren't available in web view, such as record security, are managed in the database view for now. Exceptions are bank security groups and user security. These features are currently in Limited Availability (LA) for some of our customers. For more information, see Record Security.
Blackbaud Marketplace
-
You can now search for apps or service solutions in Blackbaud Marketplace. Under Type, filter by Apps or Services.
-
We've improved how you connect SKY applications to your Blackbaud solutions, including Financial Edge NXT. For more information, see the Financial Edge NXT Community.
SKY Developer
We added the ListCreditMemos endpoint for the Payables API.
Note: Don’t see this yet? In web view, managing bank security groups and assigning users is currently in Limited Availability (LA) for some of our customers.
We added the GetFund endpoint for the General Ledger API.
The Query API is now available as a public preview. To find records that meet certain criteria, you can now view queries in web view that were created in database view.
The Fixed assets API is now generally available.